
121 lines
3.5 KiB
Markdown
121 lines
3.5 KiB
Markdown
## Contributing
|
|
|
|
### Developing
|
|
|
|
#### Development environment
|
|
|
|
Developing evcc requires [Go][1] 1.22 and [Node][2] 18. We recommend VSCode with the [Go](https://marketplace.visualstudio.com/items?itemName=golang.Go), [Prettier](https://marketplace.visualstudio.com/items?itemName=esbenp.prettier-vscode) and [Vetur](https://marketplace.visualstudio.com/items?itemName=octref.vetur) extensions.
|
|
|
|
We use linters (golangci-lint, Prettier) to keep a coherent source code formatting. It's recommended to use the format-on-save feature of your editor. You can manually reformat your code by running:
|
|
|
|
```sh
|
|
make lint
|
|
make lint-ui
|
|
```
|
|
|
|
#### Changing device templates
|
|
|
|
evcc supports a massive amount of different devices. To keep our documentation and website in sync with the latest software the core project (this repo) generates meta-data that's pushed to the `docs` and `evcc.io` repository. Make sure to update this meta-data every time you make changes to a templates.
|
|
|
|
```sh
|
|
make docs
|
|
```
|
|
|
|
If you miss one of the above steps Gitub Actions will likely trigger a **Porcelain** error.
|
|
|
|
### Building from source
|
|
|
|
Install prerequisites (once):
|
|
|
|
```sh
|
|
make install-ui
|
|
make install
|
|
```
|
|
|
|
Build and run:
|
|
|
|
```sh
|
|
make
|
|
./evcc
|
|
```
|
|
|
|
Open UI at http://127.0.0.1:7070
|
|
|
|
To run without creating the `evcc` binary use:
|
|
|
|
go run ./...
|
|
|
|
#### Cross Compiling
|
|
|
|
To compile a version for an ARM device like a Raspberry Pi set GO command variables as needed, eg:
|
|
|
|
```sh
|
|
GOOS=linux GOARCH=arm GOARM=6 make
|
|
```
|
|
|
|
#### Publishing docker images
|
|
|
|
```sh
|
|
make docker DOCKER_IMAGE=my/docker DOCKER_TAG=0815
|
|
```
|
|
|
|
### Debugging in VS Code
|
|
|
|
#### evcc Core
|
|
|
|
To debug a local evcc build in VS Code, add the following entry to your `launch.json`.
|
|
You can adjust the referred configuration as needed to e.g. use your live configuration.
|
|
|
|
```json
|
|
{
|
|
"name": "Launch evcc local build with demo config",
|
|
"type": "go",
|
|
"request": "launch",
|
|
"mode": "auto",
|
|
"program": "${workspaceFolder}",
|
|
"args": ["-c", "${workspaceFolder}/cmd/demo.yaml"],
|
|
"cwd": "${workspaceFolder}",
|
|
},
|
|
```
|
|
|
|
#### UI
|
|
|
|
For frontend development start the Vue toolchain in dev-mode. Open http://127.0.0.1:7071/ to get to the live reloading development server. It pulls its data from port 7070 (see above).
|
|
|
|
```sh
|
|
npm install
|
|
npm run dev
|
|
```
|
|
|
|
#### Integration testing
|
|
|
|
We use Playwright for end-to-end integration tests. They start a local evcc instance with different configuration yamls and prefilled databases. To run them, you have to do a local build first.
|
|
|
|
```sh
|
|
make ui build
|
|
npm run playwright
|
|
```
|
|
|
|
#### Simulating device state
|
|
|
|
Since we don't want to run tests against real devices or cloud services, we've build a simple simulator that lets you emulated meters, vehicles and loadpoints. The simulators web interface runs on http://localhost:7072.
|
|
|
|
```
|
|
npm run simulator
|
|
```
|
|
|
|
Run an evcc instance that uses simulator data. This configuration runs with a very high refresh interval to speed up testing.
|
|
|
|
```
|
|
make ui build
|
|
./evcc --config tests/simulator.evcc.yaml
|
|
```
|
|
|
|
### Adding or modifying translations
|
|
|
|
evcc already includes many translations for the UI. We're using [Weblate](https://hosted.weblate.org/projects/evcc/evcc/) to maintain translations. Feel free to add more languages or verify and edit existing translations. Weblate will automatically push all modifications to the evcc repository where they get reviewed and merged.
|
|
|
|
[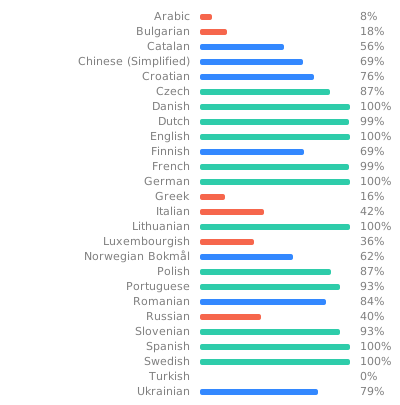](https://hosted.weblate.org/engage/evcc/)
|
|
|
|
[1]: https://go.dev
|
|
[2]: https://nodejs.org/
|